DIY Loft Insulation: Step-by-Step Guide to Laying Mineral Wool

Laying loft insulation is one of the most effective energy efficiency improvements you can do yourself, and this DIY loft insulation guide will walk you through every step. With material costs as low as GBP 250 to GBP 400 for a typical semi-detached house, DIY loft insulation delivers payback in as little as one to two years through reduced heating bills. You do not need specialist skills, but you do need to follow safety precautions and avoid a handful of common mistakes that can undermine your efforts.
How to Lay Loft Insulation Yourself
- Prepare the loft space — clear stored items, lay boards across joists for safe access and fit a dust mask, gloves and goggles before handling mineral wool
- Seal gaps and draughts — fill holes around pipes, cables and light fittings with expanding foam or fire-rated sealant before laying insulation
- Lay the first layer between joists — unroll 100mm mineral wool rolls tightly between the ceiling joists, cutting to fit with a sharp knife
- Lay the second layer across the joists — run 170mm rolls at right angles over the top of the joists, bringing the total depth to 270mm
- Insulate the loft hatch — glue or staple a 270mm-thick block of insulation to the top of the hatch cover and fit draught strips around the frame
- Avoid blocking ventilation — keep eaves vents clear by fitting proprietary eaves ventilation trays where the insulation meets the roof slope
- Insulate water pipes and tanks — lag all exposed pipes and fit an insulation jacket around any cold water tanks, as the insulated loft will now be colder
DIY loft insulation is one of the most straightforward home improvement projects and costs £150 to £300 in materials for a typical 3-bedroom house. Mineral wool rolls are available from any builders’ merchant and require no specialist tools. The job takes 2 to 4 hours for most loft spaces and saves £50 to £115 per year on heating bills.
What You Will Need: Materials and Safety Equipment
Before climbing into the loft, gather everything you need. Working in a loft is awkward, so minimising trips up and down the ladder makes the job far more pleasant.
Safety equipment (essential)
- FFP2 or FFP3 dust mask: Mineral wool fibres irritate the lungs. A basic paper mask is not adequate. An FFP2 rated mask costs around GBP 3 to GBP 5 and is essential.
- Safety goggles: Fibres can irritate eyes severely. Standard glasses are not sufficient; use sealed goggles.
- Long sleeves, long trousers, and gloves: Mineral wool fibres cause skin irritation. Wear clothing you can wash immediately afterwards, or disposable overalls (around GBP 5 per pair).
- Headtorch or portable LED light: Most lofts have poor lighting. A headtorch keeps your hands free.
- Sturdy loft boards or scaffold planks: You must have something to kneel or stand on. Never stand between joists, as you will go through the ceiling.
Materials
- Mineral wool rolls (glass or rock wool): You need enough for two layers totalling 270mm. The first layer should match your joist depth (typically 100mm) and the second layer should make up the difference (typically 170mm). Measure your loft area and add 10% for waste and cutting.
- Insulation for pipes: Foam pipe lagging for all exposed pipes in the loft.
- Water tank jacket: If you have a cold water tank in the loft, it needs an 80mm insulation jacket.
- Draught-proofing strip for the loft hatch: Self-adhesive foam or rubber strip.
- Insulation for the loft hatch: A piece of rigid insulation board (PIR) cut to fit the hatch.
Tools
- Long straightedge or timber batten for compressing mineral wool when cutting
- Bread knife or insulation knife (serrated blade cuts mineral wool cleanly)
- Tape measure
- Stanley knife for cutting pipe insulation and rigid board
Step 1: Prepare the Loft Space
Before laying any insulation, spend time preparing the loft to make the job easier and safer.
- Clear stored items: Remove boxes, suitcases, and anything stored on the loft floor. Everything needs to come out temporarily.
- Lay working boards: Place scaffold boards or sturdy planks across the joists to create a safe working platform. Move these as you work your way across the loft.
- Check for hazards: Look for exposed electrical cables (do not cover them with insulation without first checking they are not overloaded), water pipes, and any signs of roof leaks or damp. Fix any leaks before insulating.
- Check existing insulation: If there is old, degraded insulation already in place, decide whether to remove it or lay new material over the top. If the existing material is dry and in reasonable condition, you can lay new mineral wool directly over it. If it is wet, mouldy, or vermiculite (which may contain asbestos in pre-1980s installations), seek professional advice.
- Ensure ventilation: Check that soffit vents are clear and unobstructed. You will need these to remain open to ventilate the cold loft space above the insulation.
Step 2: Lay the First Layer Between the Joists
The first layer of mineral wool sits between the ceiling joists. This is the most time-consuming part of the job because you need to cut the insulation to fit around obstacles.
- Measure joist spacing: Most UK homes have joists at 400mm or 600mm centres. Mineral wool rolls are typically 370mm or 570mm wide to friction-fit between joists at these spacings. Check your joist spacing before buying materials.
- Unroll and push into place: Start at the eaves and work towards the centre of the loft. Unroll the mineral wool along the joist bay, pushing it firmly against the previous roll to eliminate gaps. Do not compress the material, as this reduces its thermal performance.
- Cut around obstacles: Use a bread knife or serrated insulation knife to cut the mineral wool. For pipes running across joists, split the insulation horizontally and lay it either side of the pipe. For electrical cables, lay the insulation over the cable so the cable sits on top of the cold ceiling and below the insulation.
- Leave gaps at eaves: Do not push insulation right to the edge of the eaves where it could block soffit ventilation. Leave a 25mm gap at the eaves or use proprietary eaves ventilation trays (plastic baffles that maintain an airway above the insulation).
- Avoid covering recessed downlights: Standard halogen or GU10 downlights can overheat if covered with insulation, creating a fire risk. Either upgrade to fire-rated LED downlights (which can be safely covered) or install insulation caps (loft caps) over each downlight before laying the insulation.
Step 3: Lay the Second Layer Cross-Hatching Over the Joists
The second layer is laid perpendicular to the joists, running across the top of them. This cross-hatching technique eliminates the thermal bridge through the timber joists, which would otherwise account for significant heat loss.
- Roll out perpendicular: Starting at one side of the loft, unroll the second layer of mineral wool at right angles to the joists, running from one side of the loft to the other.
- Butt joints tightly: Push each roll firmly against the previous one. There should be no gaps or overlaps.
- Do not compress: The second layer should sit lightly on top of the first. Compressing mineral wool reduces the amount of trapped air, which is what provides the insulation. A 170mm roll compressed to 100mm will perform as if it were only 100mm thick.
- Work systematically: Start from the furthest point from the loft hatch and work backwards, so you do not have to walk over insulation you have already laid.
Step 4: Insulate Pipes, Tanks, and the Loft Hatch
With the main loft floor insulated, you have created a cold roof space. Everything above the insulation is now exposed to near-freezing temperatures in winter, so pipes and tanks need protecting.
- Pipe insulation: Fit foam pipe lagging to every exposed pipe in the loft. Pay particular attention to bends and joints, which are the most vulnerable to freezing. Use tape to secure the lagging and seal joints.
- Cold water tank: Fit an 80mm insulation jacket around and over the top of the tank. Do not insulate underneath the tank; you want some warmth from below to help prevent freezing. Cost: around GBP 15 to GBP 30.
- Loft hatch: This is one of the most overlooked areas. Stick a 50mm to 75mm piece of PIR insulation board to the top of the loft hatch with adhesive. Fit draught-proofing strip around the hatch frame so it seals when closed. An uninsulated, unsealed loft hatch can account for measurable heat loss.
Common DIY Loft Insulation Mistakes to Avoid
Even a straightforward job like loft insulation can go wrong. Here are the mistakes most commonly made by DIY installers.
- Blocking soffit vents: Pushing insulation into the eaves blocks the ventilation path that prevents condensation in the loft. Always leave a gap or use eaves ventilators.
- Compressing insulation: Storing heavy items on top of insulation, or squashing it to fit into tight spaces, drastically reduces its effectiveness. 270mm of mineral wool compressed to 150mm performs like 150mm of insulation, not 270mm.
- Leaving gaps: Even small gaps between rolls or around obstacles create thermal bypasses. Research shows that a 5% gap in coverage can reduce performance by up to 50%. Take time to fit insulation tightly around every obstacle.
- Covering non-fire-rated downlights: This is a genuine fire hazard. Either upgrade your downlights or fit fire-rated loft caps before insulating.
- Forgetting the loft hatch: An uninsulated, unsealed loft hatch creates a direct path for warm air to escape into the cold loft.
- Walking between joists: The ceiling below will not support your weight. Always stand or kneel on boards placed across the joists.
- Not insulating pipes and tanks: Once the loft floor is insulated, pipes and tanks are exposed to freezing temperatures. A burst pipe in the loft can cause catastrophic water damage to the rooms below.
Expected Savings from DIY Loft Insulation
The Energy Saving Trust estimates that insulating a previously uninsulated loft to 270mm in a semi-detached house saves approximately GBP 255 per year on heating bills. For a detached house with a larger roof area, savings can reach GBP 395 per year. Topping up from 120mm to 270mm saves a more modest GBP 25 to GBP 55 per year, but at a very low cost.
| Property Type | DIY Material Cost | Annual Saving | Payback Period |
|---|---|---|---|
| Mid-terrace (0mm to 270mm) | GBP 200 | GBP 165 | 15 months |
| Semi-detached (0mm to 270mm) | GBP 300 | GBP 255 | 14 months |
| Detached (0mm to 270mm) | GBP 400 | GBP 395 | 12 months |
| Semi-detached (top-up to 270mm) | GBP 200 | GBP 40 | 5 years |
These figures make loft insulation one of the fastest-payback energy efficiency measures available. If you would prefer professional installation or need advice on the right approach for your home, get a free quote from our team.
Frequently Asked Questions About DIY Loft Insulation
Can I lay new insulation over old insulation?
Yes, provided the existing insulation is dry and in reasonable condition. There is no need to remove old mineral wool before laying new material on top. If the existing insulation is wet, compressed, or degraded, it should be removed first. If your loft was insulated before 1980 and contains loose-fill vermiculite, have it tested for asbestos before disturbing it.
How do I store things in the loft after insulating?
You can install raised loft storage platforms that sit above the insulation on stilts fixed to the joists. Products like Loft Leg or StoreFloor raise boards 270mm above the joists, allowing full-depth insulation beneath with a storage platform on top. Expect to pay around GBP 400 to GBP 800 for a partial loft storage area. Never compress the insulation by placing boards directly on top of it.
Is glass wool or rock wool better for loft insulation?
Both perform similarly in terms of thermal conductivity (0.035 to 0.044 W/mK). Glass wool is lighter and easier to handle. Rock wool is denser, offers slightly better acoustic insulation, and has a higher melting point making it better for fire resistance. For straightforward loft insulation, either material works well. Glass wool tends to be slightly cheaper per roll.
Do I need Building Regulations approval for loft insulation?
No. Adding insulation to your loft does not require Building Regulations approval or planning permission. It is classified as a repair or maintenance task. The only exception is if you are converting the loft into a habitable room, which triggers full Building Regulations requirements for structure, fire safety, insulation, and means of escape.
See what these numbers mean for your home
Free instant estimate — costs, savings, payback and grants for your region.
Related Articles
Home Insulation Costs and Grants: Your Complete 2026 Guide
Update (June 2026): ECO4 closed to new applications in March 2026. Approved installations continue to December 2026. The Warm Homes: Local Grant is now the main funding route for insulation.…
18 May 2026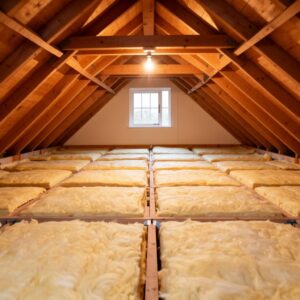
How to Reduce Condensation and Damp While Keeping Your Home Warm
Learn why condensation forms in UK homes, the difference between condensation and rising damp, and proven ventilation strategies to fix damp without losing heat.
8 May 2026
Conservatory Roof Replacement: How a Solid Roof Cuts Energy Bills and Adds Value
Replacing an old polycarbonate or glass conservatory roof with a solid insulated roof can slash heat loss, cut energy bills and turn a seasonal room into a year-round living space.
6 May 2026